Gathering Threads

Gail Doane 4-Piece Set workshop

Posted by on Apr 27 2013

I ran away from home last week.

But before you panic, don’t worry.  I didn’t tie all my belongings up in a handerchief and set off on a raft; I went to Pennsylvania to attend the SAGA Needleart Retreat in State College.

If I’d been thinking about the blog, I would have taken pictures but unfortunately, I was way too busy having fun to bother stopping long enough to  take pictures.

Trust me though, it was a fabulous few days away.  Met up with old smocking friends, made a whole bunch more and stitched and stitched and stitched.

I took Gail Doane’s 4 Piece Farmhouse Set.  I alway love making Gail’s projects and when I found out there was a chance to take a class with her, I jumped at it.  I made her justifiably famous Eloise a couple of years back and it came out beautifully.  That dress was a winter dress with a serious dress up factor.  This class focused, very sensibly, on making a coordinating set of clothes for a toddler:  an embroidered jacket, a smocked dress, a smocked top and a cute pair of reversible pants.

The jacket front is embroidered with a band of buttonhole and cast-on flowers, and a tiny row of french knots all around the perimeter.

Here is a close-up of the sleeve embroidery.

It was a great class.   Seriously, the tips and tricks she shared made the enrollment cost alone worth every penny.  How to pleat the dress front after the armholes are cut.  The best dimensions and materials for baby piping.   The purdiest bound edges you’ll ever want to see.  Cast on flowers that don’t look like they’ve been stricken with blight.  An awesome trick for overcoming the bulging wrapped end of a bound neckline.  It was a fabulous three days.

We spent the first day working on the coat embroidery and Saturday tackling different elements of the smocked dress.  Just look at my binding.  And my piping!  Aren’t they pretty?   The piping is about 1/16″; the binding is a scant 1/4″.  No ripples, no bunches.  Just smooth and firm and even. The sleeves, the hem and the neckline are all bound in the same fashion; the coat is too.  I’ll be very good at teeny-weeny bindings at the end of this project and it’s all thanks to Gail’s meticulous instruction.

The back has a touch of smocking too.  Just two narrow panels worth but it’s so nice to see something thinking about the back with as much care as the front.  There’s nothing I hate worse than ‘coffin’ clothes (all the business on the front, none on the back ;))

Sunday morning was spent just working on the project as we saw fit.  No one finished everything up, but it’s amazing what a few hours of uninterrupted sewing time will do to see you through on a project.  I’ve been working on it here at home and I’m nearly finished the dress.  I still have work to do on the jacket but I hope that before April Showers start bringing May flowers, it’ll be ready to be worn.
Raise the Roof: a new pieced quilt project

Posted by on Apr 22 2013

You’d think after finishing Spring Bouquet, I’d be all quilted out, but apparently not.  I hadn’t even finished appliqueing all those flowers down and I was already planning my next quilt, which I intended to be a pieced quilt.

I borrowed Carrie Nelson’s “Another Bite of Schnibbles: 24 Quilts from 5 and 10″ Squares” from the library over the winter, just because I thought the title was funny. There was one quilt I found particularly attractive and I decided I was going to make “Two Percent” (her titles are very whimsical and the stories behind them are equally amusing) as soon as I’d wrapped up my applique project. Whenever I happened to be in a fabric store, I kept my eyes open for fabrics in tones of blue, brown, cream and red that I thought might work.

Two Percent Quilt

The one downside to Carrie’s very accessible designs in my opinion is that these quilt patterns are designed specifically for charm packs.  Frankly, I find the idea of pre-cut, pre-selected fabric one step removed from paint by number, but I did like a number of the quilts and figured I could make them just as well from small lengths of yardage.   Nelson has a very engaging style, and I really enjoyed her colour choices, so it seemed like a sensible addition to my growing quilt pattern library.

But I was determined to get Spring Bouquet done first, so I didn’t buy my own copy of the book until I was all done.  I needed another seven dollars to qualify for free shipping, so sight unseen, I bought an earlier book of Nelson’s, “Miss Rosie’s Spice of Life Quilts“, simply because I liked the cover quilt.

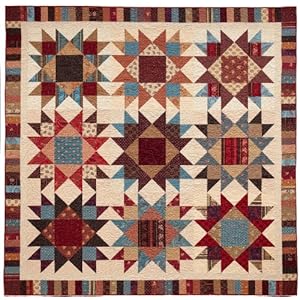
It was a great decision because not only did I find the perfect pattern for a modern, Hansel and Gretel quilt I’ve been toying with making over the summer, I ended up changing my mind entirely about my next project.  “Two Percent” was yesterday’s news; make way on the cutting table for “Raise the Roof”, a log cabin/star combination with a wonderful vintage vibe.

Thanks to my previous shopping binges, I had an excellent selection of dark, antique style prints to chose from.  The  browns, reds and blues were no problem.  A rummage in my stash revealed three perfect green prints, and I was able to find the small amounts of a cheddar, a dark violet and a gold print in a couple of local stores.  (I always find it interesting how my stash mirrors my own clothing choices – I don’t wear yellows, oranges or purple often, and I only had one measly scrap of gold fabric in my stash that wasn’t nearly enough to complete this project)

Here are the cream prints I’ll be working with.  They range from a white and beige floral, to bone, cream and tan.

There are nineteen dark fabrics, ranging from a black print, for depth and contrast, to browns, burnt orange, blue and greens. The prints are all fairly small, and interspersed with either regular patterned prints, stripes and a few random-ish all over designs.  I think they will work perfectly in replicating Carrie’s quilt design.

Everything’s been washed, starched and pressed, ready for cutting.  As soon as I finishing up my end of term marking, I hope to devote a whole day to getting everything cut out and bagged, ready for some serious chain piecing.

So I want to know:  How often do you change your mind about a sewing project?  What makes you change your mind?

Spring Bouquet Quilt Top Complete

Posted by on Apr 07 2013

It’s done.

After seven months, almost to the day, I’ve finished “Spring Bouquet”.

You can see my progress over that time in my updates:  #1, #2 and #3

It seems appropriate somehow that I reached the milestone in spring. It’s still chilly and not much has started sprouting in our neck of the woods but the sun does seem to be doing its best to sneak through and yesterday, I got into the garden and started to dig and plan.  Maybe in a few months, this is what it will look like?  Alive and bursting with colour.

My thoughts on the pattern:   Very doable. Even though this was my first applique project (yes, really!), I found the process very straight forward. I think that anyone with a bit of staying power and moderate sewing skills could tackle this project and find success. For folks with still developing skills, the pre-cut, pre-fused options would offer a reasonable shortcut.

The pattern pieces were complete and instructions for the applique and the layout were straight forward. I would have liked a centre mark on the applique guides – although it’s fairly easy to find the centre of a symmetrical layout, the assymmetrical ones were a little fussier.

The background fabric must be cut larger than the 16 1/2″ the pattern recommends. Whether you use needleturn or fusible web, the stitching process means a lot of handling for each block. I cut my blocks 17″ and then trimmed them. I was very glad I did, otherwise I know my quilt top would have been quite cock-eyed.

My only beef with the pattern came right at the end. The cutting directions for the pieced 3/4″ border were very brief. I wanted a continuous pattern, like the sample quilt. Dusted off my math skills, and calculated that 12 blocks of 22 colours would fit perfectly into 264 blocks. OK, so off I go, cutting 22 strips of cream and 22 strips of batik. Piece strip the pairs, cut them apart. Sew them into long chains, making two pair of the final four patch separately so I can attach them in the corners, only to discover that I would have needed to mirror half of the long chains if I wanted the four patch pattern to work out evenly at the corners….

Grr.

I know it’s a minor thing and I like the workaround I came up with. I inserted 4 2″ patches into the corners and it looks very nice but if something requires specialized knowledge or an extra step, I think it should be spelled out in the directions and these weren’t. Maybe it’s something ‘quilters’ know and just assume everyone else would know how to make a continuous four patch border but I’m a garment sewer and you know what they say about assuming…. 🙂

Now that it’s done and scheduled to head to my long arm quilter’s this week, I’m hoping to turn my attention to some garment sewing for spring. I still want to finish up the embroidered coat I started last winter and I’ve got a couple of fun vintage patterns that I’m itching to try.

Spring Bouquet Update #3

Posted by on Mar 19 2013

I’m making a lot of progress on Spring Bouquet.  On my last update, I was just starting the borders.  I’m happy to report that not only have I finished cutting and prepping all four of the borders, I’ve actually got two of them machine appliqued in place!  Here’s what one of the borders looks like:

It’s very looong, isn’t it? There were a lot of pieces but I’m really delighted with how they turned out.  Each of the central stems is a different brown batik and none of the flowers have the same colours or leaves.  It makes for a really lively feel.  In the individual shots, you can see how the leaves are a mix of dark and light greens, which balance against the bright yellows and pink tones.

One of my goals as I prepared each piece was to get my edges as smooth and even as possible.  It was easier to accomplish this on some shapes than others.  The basic leaves were straightforward; the blossoms and some of the more complex leaf shapes were part of my learning curve.

I’m really on the homestretch now.  All of my cutting and prep is complete and the machine applique is finished on all of the centre blocks and two of the borders.  I’ve also finished cutting all of the strips for the narrow pieced border that frame the flower blocks.   Lined up like this they really reveal how colourful this quilt will be.

Here’s what I still have to do:

  1. Press, trim and assemble the nine inner blocks.
  2. Strip piece the narrow inner border.  Cut and assemble it.  Sew it to the inner blocks.
  3. Machine applique the two remaining borders.
  4. Trim and attach the borders to the quilt.

That’s it!  I’m so close I can taste it!

Free Smocking Plate: Posy of Pansies

Posted by on Feb 26 2013

Even though February only has 28 days, sometimes it feels the longest.

Still too cold to work outdoors but not quite cold enough for winter pursuits, the snow looks grungy, everybody’s got cabin fever and it feels like the warm weather will never come again. The one thing that always cheers me up are the first flowers: snowdrops and crocuses peeping through the earth and pots of pansies – a dash of colour against the drab end of winter – on doorsteps and windowsills.

If you’re like me and just waiting for the seasons to change, I hope you’ll enjoy this smocking plate, “Posy of Pansies”. It’s an advanced picture smocking plate, with irregular shapes and a lot of colour changes. I’ve done a trio of pansies in purple, maroon and rust but you can change the colours to suit your tastes. You can download the smocking plate by clicking here.  It prints to an 8 1/2 x 11″ sheet.

As always you are welcome to share this link with friends, but please credit my website and don’t resell this design.