Gathering Threads

A Fun Smocking Podcast

Posted by on Feb 19 2011

I love it! A smocking-related podcast? Well, knock me over with a feather! It appears that the craft is being dragged, millimeter by creaking millimeter, into the 21st century. Connie sounds like a hoot – she’s tackling my Illustrator tutorial right now – and the idea of a smocking podcast just strikes me as a great idea.

So many of us are orphans, who smock and sew alone. A lucky minority can share their enthusiasm in person, through guilds and the like, but for the rest of us the internet’s a great way to connect to others, no matter the distance, and share ideas, inspiration and commiseration. There are forums and blogs and now…podcasts. You can have a listen below or check her out at http://smockingbee.blogspot.com/.

Tutorial: Designing Smocking Plates in Illustrator Pt 2

Posted by on Feb 18 2011

This is part 2 of the first tutorial on how to design smocking plates in Adobe Illustrator.
For the first half of this tutorial, including the Dropbox links to the tutorial’s files , a printer-friendly pdf of the complete instructions and step by step screen grabs for the first portion of the of the tutorial, click here.    You’ll also need to install Adobe Illustrator on your computer, if you haven’t already done so.
Note: These instructions were written using PC hotkey codes.  If you are using Illustrator on an Apple product, click here for the complete list of Mac-specific codes.

17.  Complete steps 1-14 in pt 1.

18.  Select all (Hotkey: CTRL+A).  All of the full and half stitches will be highlighted in blue.

19.  In the Symbols window, click on the button along the bottom edge that looks like a broken chain, “Break link to symbol”.   TIP: You must break the link with the symbol in order to change the symbol’s colour, size or other attributes.  The half stitches in the design are now ordinary vector shapes, not symbols, and can be changed at will.  Deselect the heart by clicking away from the highlighted shape.

20.  Using the Selection tool (Hotkey: V), click on one half stitch.  It will be highlighted.  From the upper toolbar choose Select>Same>fill colour.

All of the white half stitches will be selected, because they have the same colour as the first half stitch.

21.  Leaving the half stitches highlighted, click on the eyedropper (Hotkey: I) and using the eyedropper, click on one of the purple cables.  All of the half stitches are now purple.

22.  Deselect all of the cables by clicking CTRL+SHIFT+A.

23.  In the Layers window, lock the “cables” layer.   Unlock the “row” layer and click on the layer so that it is highlighted.  You are now working on the row layer.

24.  In the symbols window, choose the “Title” symbol.  Drag the symbol onto the graph and centre it near the top.  Click on the “Break link to symbol” button.

25.  Select the Type Tool (Hotkey: T). Click on the font inside the title box and change the title to “Hearts” and add your name as designer.

26.  From the symbols window, choose the “row numbers” symbol.  Align the box on the left hand side of the graph, centring it over the uppermost row.  With the box highlighted, click on the “Break link to symbol” button.

27.  Change the keyboard increment by using Hotkey: K.  The keyboard increment window will appear.  Change the measurement to 16mm  and click OK.

28.  Using the selection tool, (Hotkey: V), make sure the numbering box is highlighted.  With the box highlighted, hold down the ALT key.  The arrow will change from a single black arrow to a double black and white arrow.  This means that the object you have selected will be copied.  Still holding down the ALT key, tap the down arrow key.  Each time you do so, a new numbering box will appear exactly 16mm below the previous one.   Duplicate the boxes until you have one for each row.

29.  Using the Type Tool (Hotkey: T), renumber the boxes 1 thru 9, with holding rows at the top and bottom.

30.  Lock the “row” layer in the layer window.  Click on the images layer and make it invisible by clicking on the “eye” symbol.

31.  Unlock the “cable” layer.   Click on the layer to work on it.

32.  Oops.  The purple colour just isn’t right.   Highlight the cables by clicking CTRL+A.

33.  Click on the colour swatch in the bottom corner.  (Hotkey: X)  Change the CMYK colour to C 6, M 92, Y 50, K 1.

34.   Your red heart is now complete.  Save the document.  File>Save As>Tutorial1yourname.

Next Friday, Feb. 25th, I’ll post the second tutorial.    This tutorial will tackle tracing and more complex, multi-coloured picture smocking shapes.  As always, if you have any questions, just ask!

You are welcome to share this tutorial with friends and link to it on your own blog or website. Please remember to credit my site.

Valentine’s Heart Quilt Square tutorial

Posted by on Feb 12 2011

I recently taught “Introduction to Machine Quilting” at Mohawk College.  It was a fun bunch of women and we had a great time.  The class was designed to give novice quilters a basic handle on terminology, supplies, tools and techniques and give them the confidence to tackle quilting projects on their own.  I think everyone left feeling able to tackle a bigger project on their own.

Since we only had one day, I designed a simple mini-quilt that would let the students tackle piecing, quilting and finishing.  Given that Valentine’s Day was just around the corner, I thought a heart would be appropriate.  This would make an adorable bag, a pillow or even a quick and fast quilt or table runner, if you made more than one square and best of all, it’s super easy to sew, and doesn’t take a lot of fabric, making it quick and cheap to sew up.

Here’s what you’ll need for a single square.  The finished size is 14″:

Materials:

6″ medium pink print

6″ cream print

6″ dark pink print

6″  light pink check/print

18″ square batting (I like a thin, cotton batting, but any good quality batting will work)

18″ square backing fabric

1 spool good quality sewing thread

1 spool machine quilting thread

Tools

Sewing machine (having a 1/4″ foot and a walking foot are both helpful but not essential)

#80 universal sewing machine needle

Sewing scissors

Pins

Rotary cutter

Rotary cutting mat

Clear quilting ruler (6 x 24 is a good size but smaller will work)

Pencil or fabric marker

Temporary fabric adhesive (optional)

Pins or hand sewing needle

Cutting Directions

Medium Pink Print

1 –  8 1/2″  x 2 1/2″ rectangle

2 – 2 7/8″ x 2 7/8″ squares

1 – 4 7/8″ x 4 7/8″ square

Cream Print

2 – 2 7/8″ x 2 7/8″ squares

1 – 4 7/8″ x 4 7/8″ square

Dark Pink Print

2 – 2 1/4″ x WOF (width of fabric) strips for binding

1 – 1″ x WOF strip

Light Pink Check/Print

2 – 10″ x 3″ rectangles

2 – 20″ x 3″ rectangles

Here’s how to construct the square.  All seam allowances are 1/4″ unless otherwise mentioned.

1.  Draw a diagonal line from corner to corner of the light coloured 4 7/8″ and 2 7/8″ squares.   Lay the squares RS together with the corresponding medium pink squares and chain stitch 1/4″ from each side of the marked line.

2.  Using a rotary cutter or scissors, cut along the marked line to make 2 large half square triangle blocks and 4 small ones.  Press open, with seam allowances towards the darker fabric.  Trim small triangles from the corners.

3.  RS together, sew the half square triangles together along one pink edge.  Press.  Sew the two small rectangles together along one cream edge to complete the upper strip.  Lay the pieces out as indicated in the photo, with the 8 1/2 x 2 1/2 medium pink strip between the pieced strips.   RS facing, sew the large triangle strip to the long side of the rectangle.  Press.  Sew the small triangle strip in the same way to the remaining long edge.  Press.  Trim any uneven edges to square the block.

4.  Cut the dark pink 1″ wide to fit the pieced heart square.  Cut two shorter lengths, approximately the length of two sides plus a little overhang for the vertical sides.   Then, cut two longer strips for the top and bottom.

5.  Here, the vertical sides have been sewn in place and trimmed.  Now, the longer top and bottom strips can be sewn to the block to complete the inner border.   Sew the strips RS together and then trim.

6.  Here is the square with the inner border completed.

7.  The outside border is sewn in the same order as the narrow one.  RS together, sew a 10×3 rectangle to the top and bottom of the pieced square.  Press and trim.  RS facing, sew the 20″x3″ rectangles down each side to complete the block.  Press and trim.

8.  Here is the completed, trimmed block.

9.This is the reverse of the quilt block.

10.  To complete the block, sandwich the batting between the quilt top and the backing square.  Secure all of the layers either with basting or safety pins.  Quilt in the design of your choice.

11.  Bind the quilt with your preferred method.  For a simple, 1/4″ binding, you can check out this youtube video.

Tutorial: Designing Smocking Plates in Illustrator Pt 1

Posted by on Feb 11 2011

This tutorial is designed to allow smockers to create their own smocking graphs in Adobe Illustrator. It’s what I use to create the free vintage plates I offer here on my blog, like the one here and which I use to design many of my magazine projects, too. Pretty, no?
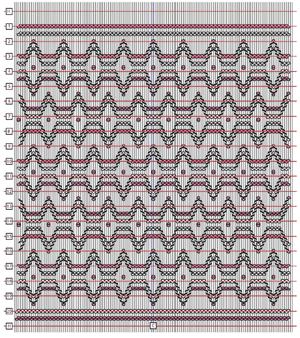
Why Illustrator? Well, there is a smocking-design software out there but it is ridiculously expensive, the graph quality is poor and I have heard from a number of designers who say the technical support is non-existent.  Frankly, I’m not willing to shell out that kind of money for something that looks that poorly and doesn’t let me do picture graphs with the detail I want. Instead, I realized a couple of years ago that Illustrator gave me the tools I needed to create templates that allow me to quickly and easily create really clean, easy to read graphs really, really simply.

Anyone can learn to use this software to design their own smocking plates.   For this tutorial, you need a computer and you need to install Adobe Illustrator, which runs on Mac and PC.   It’s several hundred dollars but there is a demo which you can use, if you want to see if this is something you’d like to do more regularly.  Also, check with your local colleges and universities.  If you know a student, they can often purchase  software at an educational discount.

For this tutorial, you also need to download the following files from Dropbox:

tutorial1

tutorial1example

It’s also helpful to have a paper copy of the instructions, so you can make notes as you work along.  Here is a print-friendly version of the complete first tutorial in pdf for your files.

Learning Goals for Tutorial 1

Tutorial 1 is an introduction to vector software and assumes no previous knowledge of vector-based software.  Complete a simple, one colour picture smocking plate, focussing on navigating around the software and utilizing the most common tools.  Use a small number of pre-made symbols from the symbols library.

What is Vector-based Software?

There are two basic types of image files for computers: vector and bitmap.  Each has their own strengths and limitations.

Bitmaps are digital image files like those from a digital camera or scan, made up of pixels or individual dots of colour.  Pros:  can create extremely nuanced, detailed images.  Cons:  each pixel requires its own “mini-file” on its location, colour, intensity etc.  Even a small image contains thousands, if not millions of mini-files, so bitmap files get large quickly.  As well, the images don’t scale (grow big or small) well and quickly become blurry.

Vector files are digital images that use lines and mathematical formulas to create shapes and images.  Pros: they’re great for logos and patterns because they’re completely scaleable.  A 1” image will look just as sharp as a 10’ image because the shapes are calculated mathematically and not with individual pixels.  The file size is very small, so the files load quickly and are easily sent by email.  Cons:  they often look flat and “cartoony” and don’t have the subtlety of a bitmap image.

Tools Used in Tutorial 1

Note: This tutorial is written with PC shortcuts.  Many of the shortcut codes are the same on the Mac but for the complete list of Mac-friendly codes, click here

Selection
(Hotkey: V)

Direct Selection
(Hotkey: A)

Lasso Tool

(Hotkey: Q)

Zoom

(Hotkey: Z)

Zoom Out

(Hotkey: ALT+Z)

Text

(Hotkey: T)

Eyedropper

(Hotkey: I)

Hand

(Hotkey: Spacebar)


Colour Palette

Instructions

1.  Open the file “tutorial1.ai”.

2.  Using the selection tool (Hotkey: V), click on the outline of the heart.  It will be highlighted with a bounding box.

3.  Right click the mouse: transform>scale.  Increase the size of the heart by a uniform 200%.  Click OK.
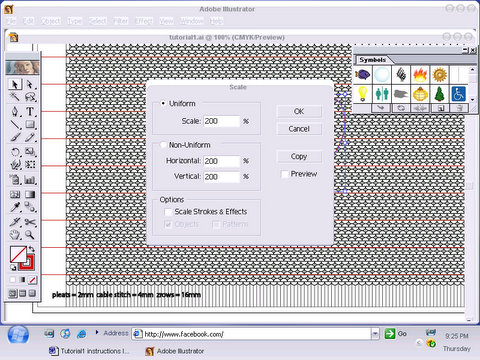
4.  With the heart still selected, drag the heart into the centre of the graph area.  Align the bottom of the shape so that the bottom point is over a down cable.  Symmetry is important to upcoming steps.
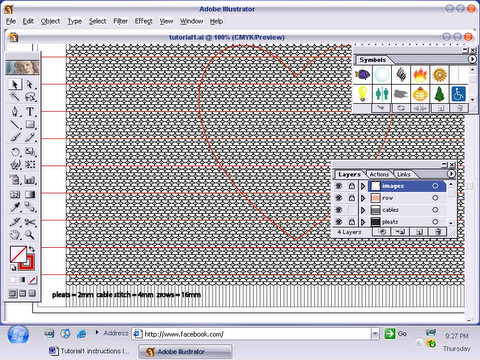
5.  Press F7 to open the “Layers” window.  You will see four layers within the window: images, rows, cables, pleats.  Beside each layer are two boxes: one with an eye, the other with a lock.   In the images layer, click on the lock.  That layer is temporarily frozen.  Unlock the cables layer by clicking on the lock.  The layer is now highlighted and ready to be modified.

6.  Using the direct select lasso tool (Hotkey: Q), draw around the unneeded cables to select them.  This is not an exact process; leave one or two cables around the heart in all direction.  The cables will be highlighted.  Click delete.  Click delete again to remove the remaining stray Bezier points.
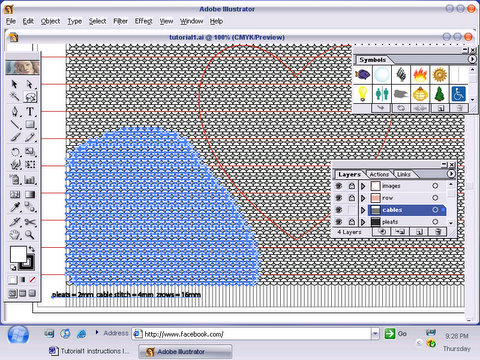
Repeat until the majority of the extra cables have been removed from around the heart shape.
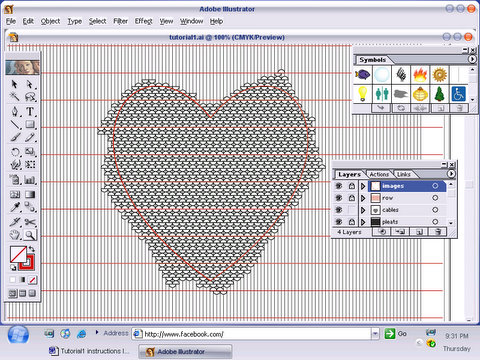
7.  To select all of the remaining cables, click CTRL+A.  The cables will be highlighted with a bounding box.
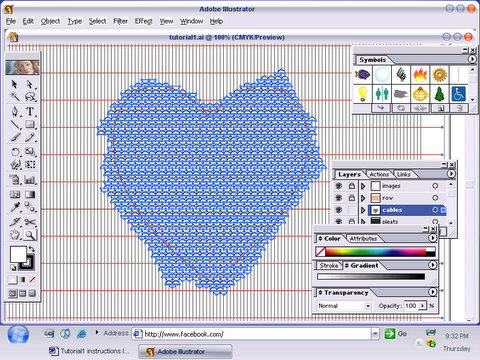
8.  Double click on the fill box in the lower left corner.  A colour palette will appear.  You can choose a colour using the slider or you can type in exact colours using the boxes.  Create a new CMYK fill colour with the following percentages: C 29%, M 91%, Y 0% K 0%
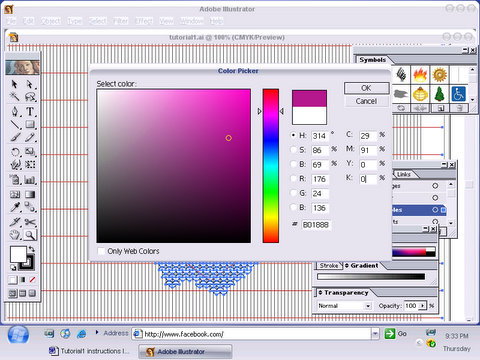
TIP: CMYK (Cyan/Magenta/Yellow/Black) is the colour process used in paper printing.  RGB (Red/Green/Blue) is used in electronic and web design.  CMYK offers several hundred thousand fewer colour options than RGB.  Therefore, always choose CMYK as your default colour setting.  You can switch from CMYK to RGB, but will distort the colours if you transform them from RGB to CMYK.

9.  Select the magnifying glass (Hot Key: Z) and zoom in until you can easily distinguish the individual cables.
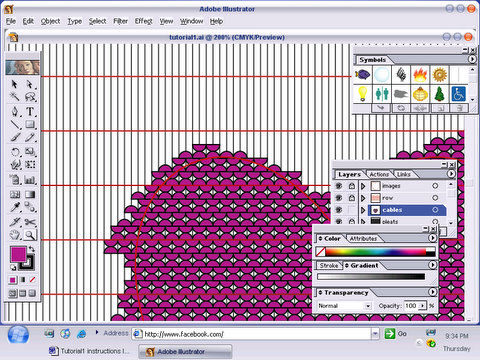
10.  Using the selection tool (Hot Key: V) and the lasso tool (Hot Key: Q), eliminate the extra cables outside of the outline.  If a cable is intersected by the outline, you must decide whether the cable is mostly inside, mostly outside or evenly divided by the line.  Leave cables that are mostly inside or evenly divided.  Remove cables that are mostly outside the line.  Be sure and consider the symmetry of the design as you remove cables.

TIP: If you need to move around the heart, hold down the SPACE BAR.  A small hand will appear where the cursor was.  Click with your mouse and the hand will appear to grab the work surface.  You may now “drag” the work surface around until the area you want to work on is visible.

10.  Open the Symbols window (Windows>Symbols or Hotkey: SHIFT + F11).  Using the scroll bar, scroll down until you find the smocking symbols.
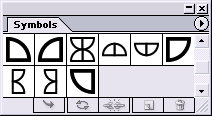
11.  On the toolbar, switch to the selection tool (Hotkey: V) and begin to delete full stitches that intersect the outline.  You may need to zoom in to see the stitches more easily.  (Hotkey: Z).  Work two or three rows at a time.   From the symbols window, drag the appropriate half stitches from the window and place them in roughly in the place.
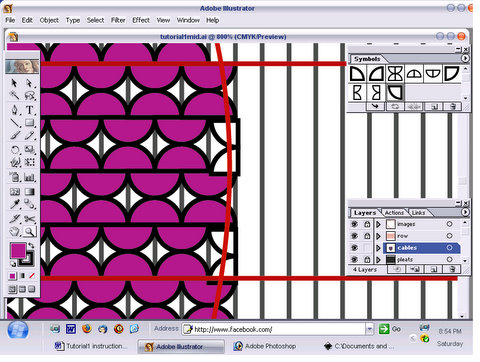
TIP: don’t worry about getting the stitches perfectly aligned.  You will be correcting imperfections in the next step.  Simply put them in their approximate place and continue the deleting/replacing process around the perimetre of the heart shape. Use the Zoom In (Hotkey: Z), Zoom Out (ALT+z) and the SPACE BAR as necessary to complete the replacement process.  Your heart should look like this after the half stitches have been placed.
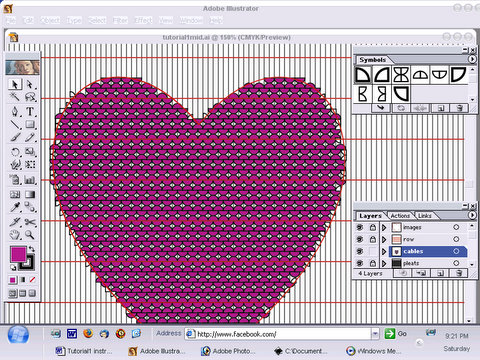
12.  When all of the half stitches are in place, zoom in (Hotkey: Z) so that the magnification at the top of the working window reads 1600%.
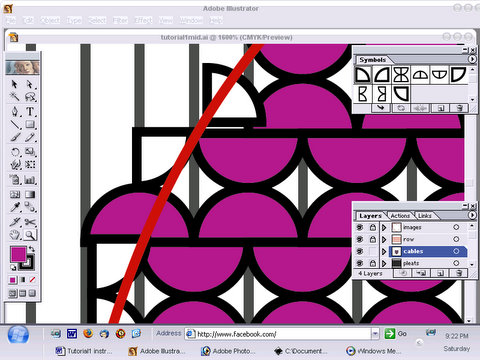
13.  Switch from “Preview Mode” (which displays the vector image as it will appear when printed) to “Outline Mode” (Windows>Outline or Hotkey: CTRL+Y).  The colour will disappear from the image and you will be left with a black and white outline.
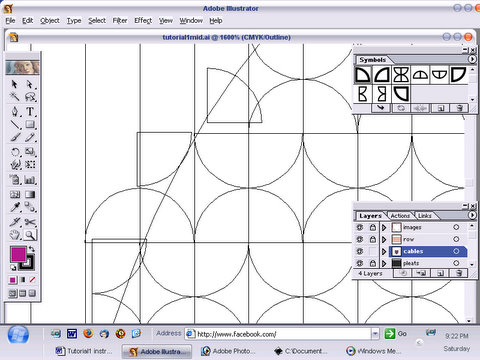
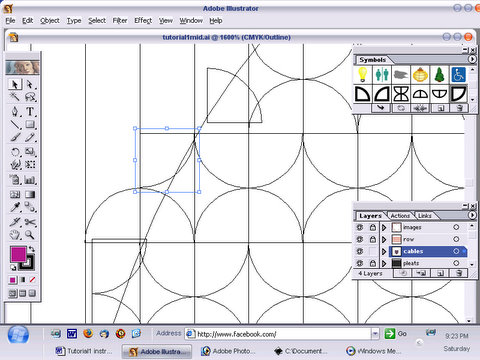
14.  Using the selection tool (Hotkey: V), carefully align the edges of the half stitches with the full cables.  Take your time and use the SPACEBAR to move around the work area as necessary.  TIP: when the shapes are properly aligned, the overlapped outline will overlap and turn white. Work around the entire heart in this fashion.
15.  Return to preview mode (Hotkey: CTRL+y) and zoom out (Hotkey: ALT+z) so that you can see the entire heart.

You’ll find the second part of this tutorial here, which will show you how to complete this simple picture smocking plate.   Tutorial 2 will see you building on the skills you’ve learned here to create an even more complicated picture smocking picture. If you have questions, post them here, because if you have questions, you probably aren’t alone! I’ll do my best to answer them.

You are welcome to share this tutorial with friends and link to it on your own blog or website. Please remember to credit my site.

Valentine’s Mail Pouch

Posted by on Feb 10 2011

These Valentine’s mail pouches were easy to make and a ton of fun.  I got the tutorial for them on the At Second Street Blog.   Nice step by steps with photos and they take hardly any fabric at all, which is nice when you’re trying to use up the “too big to toss but too small to sew with” sized scraps.

I made two and they’re identical, save for the language. One says “Mail” and the other “Poste”.  My oldest is in French Immersion, and all his classes are conducted in that language but the youngest one doesn’t start ’til next year.

Dialed back on the ruffliness factor – the corduroy gives some texture without being too fancy or girly and the only trim I added was a band of white ric-rac top and bottom to the wide, pink band.

The lining is the remains of the fabric I used for “Flower Power“.  The red and white dot is cute without being overwhelmingly “Valentine-y”.

Everything – thread, fabrics, lining, interfacing, applique fabrics, and the small buttons – were stash.

The only thing I had to purchase were the large 1 1/8″ buttons. Frankly, they’re my favourite part. Aren’t they adorable?  I cut out itty-bitty hearts and then appliquéd them down to the pink and white stripe, leaving a big space between each, so I’d have enough room to cut out each button.  Much easier to manipulate a 6″ x 6″ square than it is to try and sew on a 1 5/8″” circle.

I don’t have an embroidery machine, so for all of the appliqués, I used fusible web and drew the letters and the hearts freehand, then zig-zagged them in place with a narrow satin stitch. Easy as pie. I used a tearaway stabilizer under all of the applique. It doubled as the interfacing, too. Hardly a couture technique but it saved me a step and grief by allowing me to simply spray baste the stretchy corduroy (which was super stretchy!) fabric on top. Then I just treated the two layers as one and I didn’t have to break out my walking foot to deal with the serious creep factor.

The boys love ’em and David has already put in a request for an ‘everyday’ pouch to hang on the back of his chair. I saw some really cute frog fabric at the quilting store last week that would be perfect as a lining.