Gathering Threads

A New Look for My Blog

Posted by on Apr 29 2014

So, just a quick post to tell you all that I’ve done a bit of renovating here on my blog.

Nothing too drastic, but a few tweaks here and there, a new front page and a cleaner, hopefully easier to navigate layout.  When I started this blog five years ago (no, really, that’s how long I’ve been blogging!) I was new to blogging and wasn’t sure what direction my blog would take.  I took my best guess and started out blindly, learning as I went what worked and what didn’t.

But after all those years and more than 100 posts, it was definitely time and I like the new look a lot.   It should also take care of the pesky spammers, since the back end has also been upgraded and new security features added.  Of course, it will take me some time to get everything all gussied up in totality but in the meantime, I hope you’ll continue to visit.  I promise that now that my term is done, I will be posting a whole plethora of new projects and WIP (including the long awaiting Spring Bouquet reveal….!) and my Smocked Laces project, which has gone from sorta lacy to over-the-top lacy!  I can’t wait to show it to you all.

You can check out my new ‘Portfolio‘ feature, which is a collection of some of my favourite eye candy in one place as well as the new Tutorials feature, which brings together all of my tips and techniques in one handy dandy space.  Of course, you can still browse by category and date and my blog roll is still up and running, too.

Happy reading, folks!  What do you think of the new look?

Updating a Grace Knott Classic

Posted by on Mar 21 2014

I’m always a little suspicious of pristine cookbooks.  Sure, if it’s brand new and I’m browsing at the bookstore, pretty pictures and pristine, crisp pages are wonderful.  But if someone recommends a cookbook and their copy is immaculate, without a smudge of flour, or a smear of batter, I start to wonder just how good the food really is.  At my house, the cookbooks I use regularly look like they’ve served in the trenches, but that’s OK because it means they’re being put to the use they were intended for.
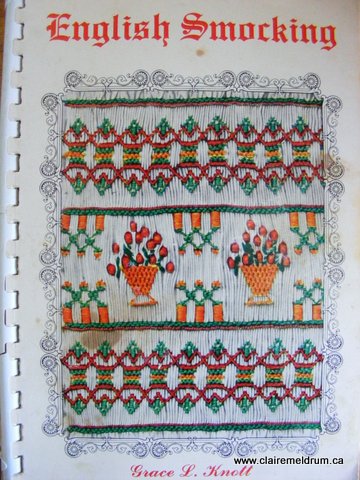
Should I apply the same logic to smocking books? If so, my copy of Grace Knott’s classic, “English Smocking,” comes with decades of recommendation behind it, too. Before it was mine, this was my mom’s copy, printed in the late seventies; my sister and I wore dresses smocked with designs from this book when I was a little girl in the mid-eighties. And my great aunt Lois (who was Martha Stewart before Miss Stewart was even a glimmer in her parents’ eye), smocked for her step-daughter in the 1940s using an earlier edition.  Grace Knott really established smocking and kept it alive before its revival.  This book is well-loved, to put it mildly.
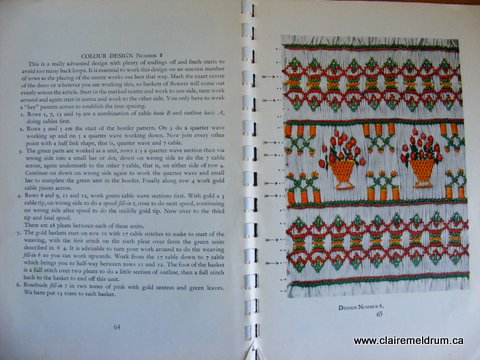
I think there’s a tendency amongst smockers (and I’m certainly guilty of this!) of preferring the shiny glossy designs of recent publications.  The colours and fabrics are up to date and it’s so easy to envision the finished product, thanks to the step by step photographs.  Old designs seem kind of daunting, with their spare, written directions and dated colour schemes.    Yellows and browns?  Ewww.  Orange and green?  Yuck.  How could anyone smock anything so old-fashioned?
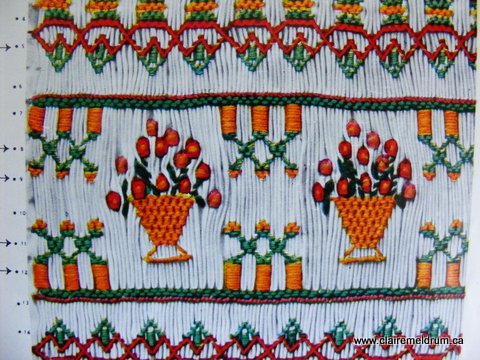
So, do you think my lastest smocking project looks out of date?  Because I sure don’t and yet, it’s a design that was published almost four decades ago.
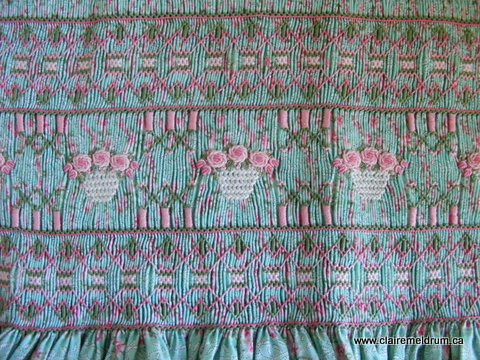
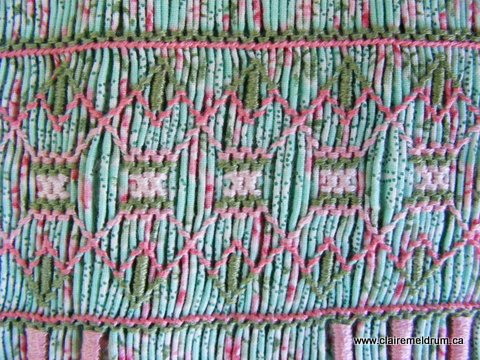
All I’ve done is change the colour palette and switch out the wrapped roses and stacked cable baskets for bullions and open herringbone.   And suddenly, the symmetry and classic proportions look timeless and fresh once again.
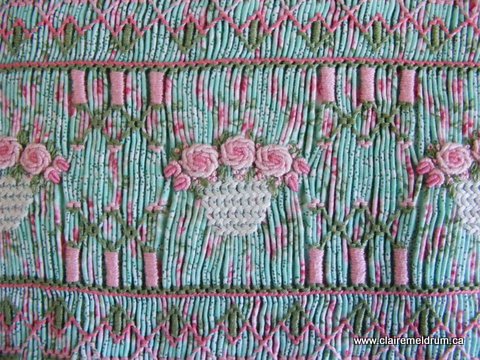
There’s a lot of wonderful detail in this plate – colours and stitches are built on top of each other to give a wonderful sense of depth and complexity.  This was certainly a very involved design but totally worth it, I think.
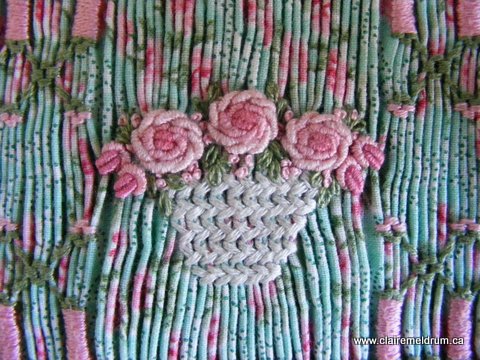
The baskets are one of my favourite details:  Big, three colour roses, surrounded by smaller bullion buds, detached chain and a smattering of pink french knots, all sitting in a herringbone stitch basket.  The basket, if I do say so myself, was a stroke of genius.  Not only is the texture a dead ringer for actual wicker but it serves a secret purpose as well.
That’s because herringbone is one of the must-stitches for smockers submitting their garments and samplers for Level 2 Artisan evaluation.  When you add in the fact that bars and spools are also required stitches, this plate was a perfect fit.  And since most contemporary designs shy away from spools and bars – trellis and wave stitch definitely predominate – finding a plate that I could use on my partial yoke dress example made choosing a vintage design like this a no-brainer.
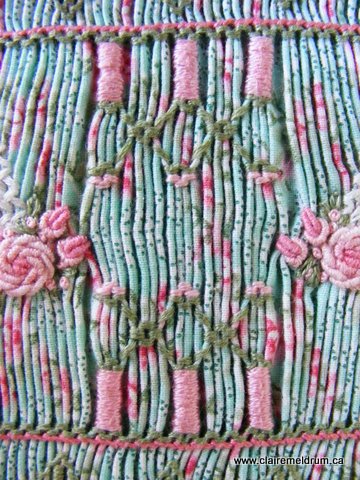
Of course, I still have to construct the dress but that will have to wait until I finish my term papers (on Dorothy Wordsworth and Lucy Hutchinson, in case any of you have any interest in either Romantic poetry or early modern translation).   So there you have it, a classic design updated but still true to its smocking roots!


Smocking Exhibit opens at Lacis March 8

Posted by on Feb 19 2014

If you are a lover of smocking, the needle arts, fashion, fabric manipulation or fashion history, don’t miss this once in a lifetime opportunity to see the exhibit Smocking, Fabric Manipulation and Beyond, at the Lacis Museum in Berkeley, California. Gathered in one place, you will find amazing pieces that span the decades and demonstrate the versatility of smocking. From the homely shepherd’s frock to the dress worn by Anne Hathaway in Les Miserables to the breathtaking dress recently featured in Threads magazine to the work of modern artisans, it is all gathered at the Lacis Museum in Berkeley California from March 8th through October 4th, 2014. The opening reception is March 13th and special classes and lectures are planned for the 13th through the 15th.

The impetus for the exhibit began with Sarah Douglas’ donation to the Lacis Museum of all her smocking tools, research and plates. Sarah was instrumental in the revival of smocking in the 1980s and was involved with the Smocking Arts Guild of America (SAGA), a not for profit guild formed at that time to help preserve and foster the art of smocking and related needlearts. As word of the donation spread, Nelli Durand and Mimi Ahern, also part of smocking’s revival in the 1980s, also donated their collections. The Lacis Museum joined with SAGA, and the Cable Car Cablers, the local chapter of SAGA, to collect and display pieces of this art form from around the country.

The art of smocking arose from the necessity to fit the fabric to the body. Without the skills of tailoring, the alternative was manipulate the fabric itself by simply gathering the fabric where it was too loose and securing the gathers by stitching across them creating a stretchable, comfortable fitting garment. The shaping would soon go beyond simple fitting to providing form to the garment as well as decoration through the use of elaborate embroidery on the pleats. Eventually the technique would become an independent art form free from any necessary function.

SAGA is sponsoring the opening of the exhibit March 13th-15th with a lecture on the history of smocking, classes in smocking on the 14th and 15th, and a reception on the 13th that includes a behind the scenes tour. Space is limited. For more information and to reserve your spot go to www.smocking.org.

A Quick Vintage-Style Quilt

Posted by on Jan 22 2014

So, my sewing goal for 2014 is to eliminate all of my UFOs.

No.  Really.  Stop laughing.  I’m serious! I am hereby announcing that I intend to finish all of the UFOs currently lurking in my stash and in my sewing room before the end of 2014.

I already finished up Shiny Brite. Now here’s a look at another quilt that I managed to put together over the Christmas holidays. It’s called Emily’s Wedding Quilt (and no, I’m not getting married, no one I know is getting married – I just liked the pattern). It’s a pattern from the May/June issue of Fons and Porter’s Lover of Quilting magazine. The same issue, in fact, that Power of Four, came from. Happily, this quilt’s instructions were actually accurate and it went together in almost no time at all.

The one thing I changed was the size. The original design in the magazine was 115″ x 115″. Goodness gracious, I could hide a small brigade under a quilt that size.   Instead, I made a smaller version (63 x 81), basing it on a free variation that was posted on the F&P website.

The variation, called Aunt Gracie’s Garden, was much more manageable.  It did feature an applique border, but in the end, I decided to leave it off, and simply go with the reproduction fabrics.   It softens the ‘old-timey’ look that this quilt has, what with all the 1930s style prints, updating it a little with the more modern, borderless layout.

Some of the fabrics were stash, but primarily, I sourced the fabrics for this quilt piecemeal.   A couple of fat quarters from this shop.  8″ of yardage at another.   It gave me something to buy when I visited shops over the summer without obliging me to buy yards and yards of fabric that I might or might not end up using.  When I had 40 or so different prints, I cut the blocks.

This quilt was also an excuse to try some specialty rulers.  When Joann’s was having a 50% off sale, I bought a half square triangle ruler and a tri-rec ruler set.  I used both for the two different blocks in this quilt and I have to say, I liked them a lot.  It certainly sped up the cutting time and the results were, by and large, accurate.  A couple of the pointy pointy wedges were a little off, but that could be operator error. 🙂  If I was completing an heirloom quality quilt, I’d probably still go with marking the backs of squares 7/8″ larger than the finished size but for this type of casual quilt, the rulers both worked very well.

Then all the fabrics sat and sat and sat in their little baggies and nothing much happened to them until I finally tackled the quilt over the holidays.  It went together effortlessly and was done almost before I could believe it.  Seriously, a couple of days at the machine and it was done except for assembling the rows.  That’s a real benefit when your sewing time is limited.

The backing is an out of print 1930s floral print that I got for a steal at Lens Mill.  For binding I’ll be using a soft purple and white stripe – it was stash but it matched perfectly.  The boys were surprisingly enamoured of this quilt, given all the pastels its featured.  But they loved the optical illusion factor and spent lots of time ‘finding’ the different circles hidden throughout the quilt.  Allison is going to be quilting it to emphasize that sense of movement and there will be a floral stencil in the centre of each ‘circle’.  So the UFO count now stands at 2 for 2014.   I’m back at school now, teaching and doing my PhD coursework, so my free time is greatly curtailed but I’m making progress on a couple of other UFOs, including a cute smocked outfit that I hope to show you shortly.

Shiny Brite Quilt Top Complete

Posted by on Jan 15 2014

Hoorah!  Shiny Brite is wrapped and off to Allison’s for the quilting.

It had been sitting, all the blocks trimmed and completed, since August.  You can see how far I’ve come since my last update on this project.  But all through the fall, every time I shifted the box the pieces lived in to get at something else, I felt guilty.

But school has to be a priority (and yes, I did very well in my graduate classes last term, although if I never read Shirley again I’ll be OK with that).  So once my coursework was wrapped up in December, I went at Shiny Brite with a vengeance.

I ended up making it a little smaller than my original plan of 10 x 12 blocks.  Instead, I ended up with a 9 x 11 block quilt, with 1″ inner sashing and a 6″ border, for a completed size of 68 x 80.  A great size for a twin bed.

This left me with extra kaleidoscope blocks.  It actually worked out well because Carrie Nelson’s quilt was finished with a piano key border but I wanted to feature the fabric that had inspired the colour palette in the first place – an OOP Connecting Threads fabric called “To Grandmother’s House”.

I ended up fussy cutting the border to feature the gingerbread houses.  They look great but it did create a dilemma while I was considering what to do with the borders.  The fussy cutting would take up a lot of fabric – about 1 3/4 yds, since each of the eight strips took up almost 11 inches in total (6 1/2 for the pattern, plus the excess needed to match).  This meant I didn’t have enough for me to use the same fabric for the backing, as I’d originally intended.   In the end, I decided that unmatched borders would bug me a lot more than not having a matching backing print so I went with the fussy cut borders and picked up a small all-over pink print for the backing.  The excess gingerbread fabric has found a good home though – my mother sews aprons for charity and she’ll be able to get 3 aprons out of my remainders.

Rather than mitre my corners, I decided to put my extra blocks to use, putting a kaleidoscope block in each corner.  Easier than mitring and it connected the two elements together visually.

The last thing I added was the ric-rac.  I followed Carrie’s instructions and used the off-white print as the inner sashing.  But it just seemed to fade away into insignificance, especially because the off-white fabric and the cream background were so similar.  I didn’t have enough of the candy cane stripe fabric to use it instead.  In the end I went with a 3/4″ wide hot pink ric-rac and it was just the trick.

A quick preshrink, a daub of fabric glue and it was in place.  I don’t know if you can see it in these images but I actually stitched the trim down on both sides.  I found the perfect specialty stitch on my machine and after a little testing, found the settings that allowed me to stitch the ric-rac down permanently with the serpentine stitch.   This should prevent the edges from curling up after the quilt gets washed.  I hate when the points curl up on ric-rac – it just looks weird.

The quilting will be pretty straight forward.  Allison and I decided on a candy-like swirl in each of the blocks, and a 1″ cross hatching in the border.  The small on-point squares will have a small flower motif, to pick up the border print.  It should be fun and lively, in keeping with the fabrics.

In all, I’m pleased with my first UFO-FO (unfinished object finished off :)) of 2014.  I’ve got a few more to show you in the next while, so stay tuned for updates here on my blog.